
Hey, fellow travelers! I’m back again with another new recipe, just in time for Cinco de Mayo. Today, I’m going to teach you how to make gorditas, tasty little Mexican morsels that have few ingredients but are big in taste.
Now, what exactly a gordita is and how it is prepared varies greatly depending on where you are in Latin America. There are some gorditas that are more like pitas or puffy tortillas that are cooked on the stove top and then are split open and stuffed with a variety of fillings. There are other gorditas that look more similar to tortillas and are not stuffed, but have toppings placed on them after cooking. There are even other gorditas that are more similar to empanadas and are stuffed before cooking and then deep fried.
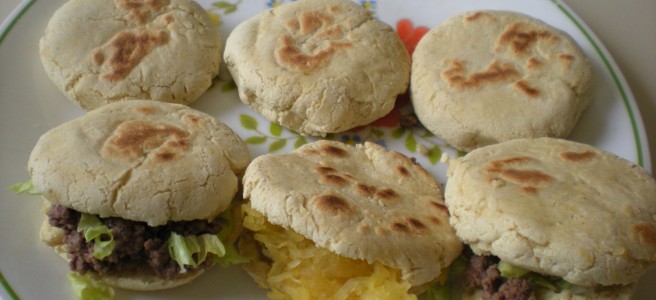
The gorditas that I will teach you how to make today are something of a cross between a tortilla, an American biscuit and an English muffin. This style of gordita is very similar to some varieties that are traditionally prepared in the northern states of Mexico. My gordita recipe is made with a mixture of all purpose flour and Masa harina (corn flour) along with a little salt, water and baking powder. They are cooked on the stove top and will inflate while cooking. This makes them perfect for stuffing with any kind of filling that you wish. Refried beans, guacamole, shredded chicken or pork, ground beef, salsa… the possibilities are endless.
These gorditas cook up in less than 10 minutes and are an excellent quick breakfast or great addition to any meal. And what’s even better is that you don’t need any oil to cook them. While some recipes for gorditas are either deep fried or fried in lard or oil, my recipe is simply cooked in a nonstick skillet on medium-high heat. If you want to have gorditas that are golden brown, you can use one to two teaspoons (about 5 – 10ml) of olive oil, but that isn’t required.
So what do you say we head on over to the kitchen and whip up something good?
Ingredients
1 cup (100 g) Masa harina (see footnote 1)
3/4 cup (100 g) all purpose flour (I use enriched and presifted)
salt to taste (I like to use about an 1/8 teaspoon for myself)
3 teaspoons (12 g) baking powder
about 3/4 cup + 1 tbsp (175 ml) warm water (see footnote 2)
1 – 2 tsp (5-10 ml) olive oil (optional)
Instructions
In a large mixing bowl, mix together the Masa, all purpose flour, salt and baking powder until well Incorporated.
Pour in about half the amount of water and begin to mix. Continue to mix while gradually adding more. You’ll want to stop once you get a dough that has the texture and consistency of Play-Doh, not too dry but not too wet.
Break off pieces of dough and shape into balls about 1 1/2 inches (4 cm) in diameter. Using your hands or a glass, slightly flatten the balls. You’ll want the gorditas to look like small fat pitas: you don’t them to be as flat as a tortilla, at least not for this recipe. Leave them to rest on a large dish.
Preheat a large nonstick skillet on medium-high heat. Once the skillet is hot, place the gorditas inside, keeping them spaced apart from one another so they’re easier to turn. Cook gorditas for about 3 – 4 minutes per side. You want the gorditas to be slightly brown and blistered on each side. Once the gorditas are done cooking, transfer them to a dish and allow them to sit for about 2 – 3 minutes, until they cool slightly. Using a fork, slightly split open the gordita and stuff with filling of choice.
Makes about six 2 1/2 inch (6.5 cm) gorditas.
Notes
My gordita recipe is partially adapted from a recipe made by former MasterChef Season 4 contestant Adriana Guillen. my recipe is essentially the same as hers, except I use slightly more flour and less baking powder.
1. Masa harina is a type of flour made from ground corn that is commonly used in Mexican cooking. You can find Masa harina in Mexican grocery stores, as well as in most chain supermarkets. You can even find small bags of it at some dollar stores in North America. There’s one particular chain where you can get a small bag of Masa for just a dollar. My American readers will probably know which one I’m referring to. 😉 Let’s just say money grows on it.
Masa harina is much different in texture then cornmeal, so I would advise against trying to substitute cornmeal in place of it.
2. As with most recipes for bread or any kind of recipe that requires you to make a dough, the amount of water given is very suggestive. I’ve learned in the last few months while making various kinds of traditional Sicilian breads that depending on where you live in the world, the amount of water needed in bread recipes varies wildly. The amount I’ve listed is a rough estimate based upon my own experience.
When making any kind of bread or similar recipe with water and flour, it’s a good rule to start with about half the amount of water given and to gradually add the rest in small increments. Depending on where you live, you may or may not need extra water. It’s better to start with a dough that’s too dry and to work your way up from there then to end up with a dough that’s too wet and difficult to work with.